So you’re going ziplining? Here’s how to film your zipline excursion with your GoPro. These tips cover composition, settings, gear, and mounts. Plus, some great GoPro zipline videos.
12 Tips for Using Your GoPro on a Zipline
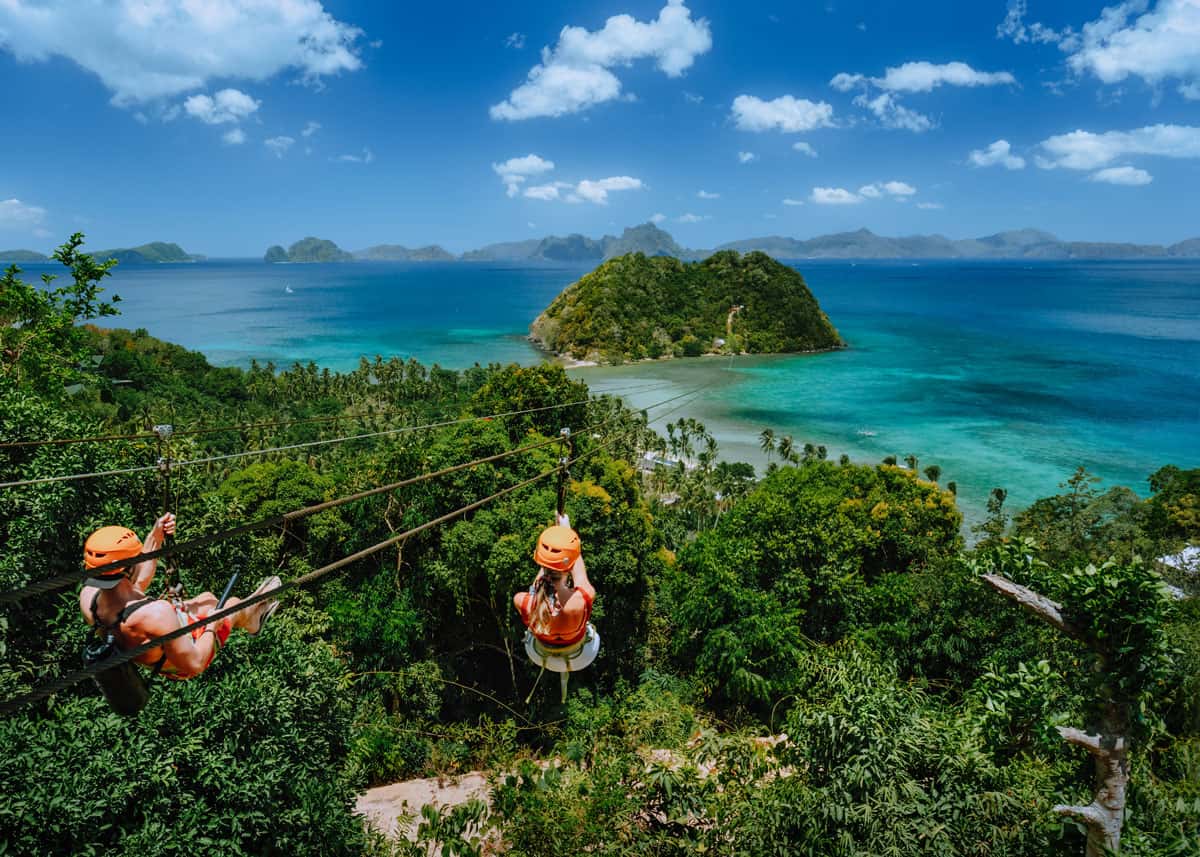
GoPro cameras are perfect for this excursion. Here’s a taste of what your GoPro can capture on a zipline.
In this video, watch Marshall Miller zipline in a pretty epic way.
1. Turn on HyperSmooth
This can make the difference between shaky, unwatchable video and smooth, amazing footage.
Hero5 and Hero6 cameras both came with in-camera video stabilization. And while that’s okay, it doesn’t really compare to HyperSmooth.
The HyperSmooth feature has been available in every GoPro since the Hero7 Black. The Hero11 Black has Hypersmooth 5.0.
If you want stable footage, make sure to turn this on.
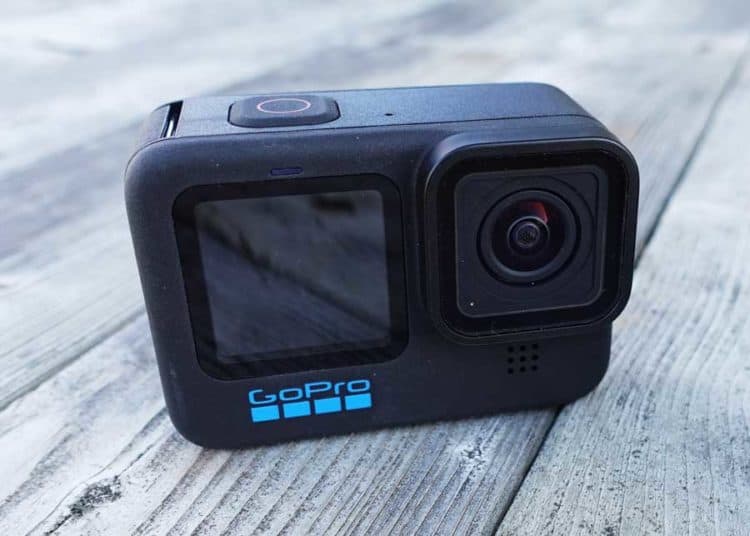
2. The best GoPro for zipline footage
I recommend the Hero11 Black for your zipline excursion.
Here’s why:
- Hero11 Black has HyperSmooth 5.0. Image stabilization is pretty important when filming your zipline run.
- It has a built-in mount system – without additional housing. You can easily mount it to your head, chest, or selfie stick.
- It shoots up to 5.3K video at 60 frames per second. You can shoot at super high resolution and still slow it down. This will make some epic zipline videos.
- Voice commands: Choose from a full set of voice commands to make filming super easy (and hands-free). Start and stop filming and easily add a HiLight tag – to find your favorite moments after the event.
Get your GoPro Hero11 Black on Amazon, B&H Photo, or Best Buy.
If you already own a GoPro, I’m sure you’ll get good footage with it. There is no need to upgrade just for this.
Especially if you have a Hero8, Hero9, or Hero10 Black – they’ll give you good results.
Thinking about another brand? Here’s how the GoPro Hero11 Black compares to DJI Osmo Action 3
3. Shoot in 360 Degrees
If you want to go big, you might consider GoPro Max – their latest 360 camera. This will capture 360-degree video footage of your trip.
Once you get home, you can choose the angles and perspectives you prefer. Or you can publish the immersive video to YouTube and share the full experience.
Now let’s consider some tips for better composition.
4. Include yourself in the footage
There are lots of videos (like this) of people zipping through the forests of Costa Rica while filming with their GoPro. The problem is that they forget to include themselves – or anyone else.
While it’s fine to shoot the cable and the scenery, it’s generic. It looks like everyone else’s video. The real interest is in the reaction.
It’s kind of like this video. Now, this is a memorable clip.
5. Shoot multiple perspectives
So while it’s important to get yourself in the frame, it’s good to capture the trip as well. It’s the storytelling component that makes a great video.
Try to include the stair climb, getting hooked up, your reaction, the scenery, and some perspective of the height and speed.
This combination will capture the feeling and the memories of the trip.
The next two tips will help you do that.
6. Bring two cameras
Like in the opening video, two cameras help to tell a good story.
The waist-mounted camera captured his reaction, while the selfie stick showed the height of the zipline and gave some context to the trip.
If you have an older GoPro, you might also pick up a newer model to make up your second camera. Adding a second camera adds some depth to your video.
Now, let’s look at a few mounts to consider.
7. Use the Spivo 360
I’m a big fan of this selfie stick. The Spivo 360 will rotate your GoPro 180 degrees with a button.
This is a super-easy way to shoot both perspectives.
Here’s a taste of what it can do. The footage in the video isn’t fantastic, but it gives a good idea about what the rotating selfie stick can do.
8. Use a Selfie Stick
I know; I mentioned this one already. But you don’t have to use a rotating selfie stick like the Spivo 360.
Any selfie stick will give a good perspective. I recommend using the selfie stick to shoot your reaction and to show where you’ve been.
Be sure to put your hand inside the wrist strap. I probably don’t need to say this, but if it falls – it’s probably gone forever.
Here’s more about GoPro wrist straps.
9. Use a Chest or Helmet Mount
![]() Unless you are using your own helmet (unlikely) or there is already a GoPro adhesive mount on the borrowed helmet, you’ll have a hard time mounting one on their helmet.
Unless you are using your own helmet (unlikely) or there is already a GoPro adhesive mount on the borrowed helmet, you’ll have a hard time mounting one on their helmet.
Some helmet mounts use straps instead of adhesive – and you could consider those.
But I recommend a chest mount instead, like this one by GoPro. It can help capture your speed and the beauty of your surroundings.
It can also capture some perspective for the height of the zipline.
Now let’s move on to the best settings for GoPro zipline videos.
10. GoPro Settings
Here are the video settings I recommend for shooting your zipline excursion.
- Video Resolution: 4K 60 fps (Wide Lens)
- Video Resolution (for slo-mo): 2.7K 120 fps (Wide Lens)
- Aspect ratio: 16:9
- HyperSmooth: On (for Hero7 or Hero8)
- Protune: Off (unless you want to color edit the footage on your computer)
Shooting at 120fps will allow you to slow your footage to 1/4 of the original speed – and still be crisp. But you can also render this footage at normal speed.
11. Shoot in GoPro TimeWarp
When you want to capture part of the excursion (but it’s a little boring) you can shoot in TimeWarp.
TimeWarp is a time-lapse video that has HyperSmooth applied. It shows what is happening but in a much more consumable format.
- When walking to the site and climbing the stairs, I recommend a 10x speed. This will render 5 minutes of recording time in 30 seconds.
- If you are biking, you might increase that to 15x (5 minutes in 20 seconds) or even 30x (5 minutes in 10 seconds).
If you want to capture lots of detail on the zipline, turn off TimeWarp before getting hooked to the cable.
12. GoPro Zipline Videos (Inspiration)
Here are a few videos to inspire you as you plan your excursion.
This first video is of the Sasquatch Zipline – a 2.2 km long zipline in Whistler, BC.
It is the longest zipline in North America. This clip was shot with a Hero5 and a Hero6.
In this video by Jackson Groves, you’ll see a great example of storytelling. And keeping it simple.
Just the high points – and some great personality.
This video was filmed at Kualoa Ranch Zipline in Oahu, Hawaii.

You can pick up some speed on a zipline. Here’s how to reduce GoPro wind noise while whistling through the treetops.
You might also consider shooting with a GoPro bite mount. Here’s our guide to the best GoPro mouth mounts.
Your Turn
How did your GoPro zipline excursion go? Please share a link to your video below. Plus, I would love to hear any tips and suggestions.
- About the Author
- Latest Posts
Hey, I’m Bryan! I’m a content creator and co-founder of Storyteller Tech.
Experienced GoPro Videographer: I’ve been shooting with GoPro cameras for over 11 years. My first GoPro was the Hero3 Silver, bought for a Galapagos work trip in 2012. Today I own 20+ action cameras, including GoPro, DJI, and Insta360 cameras.
Professional Creator: Dena and I have developed video and content marketing plans for numerous international travel brands. And we also run several content businesses.
Bryan also creates at Storyteller.Travel and is co-founder of Storyteller Media, a Canadian-based publishing company.