Here are 16 GoPro photography tips that will help you take control and get great photos – with your GoPro camera. They apply to all models, from the new Hero11 and even back to the Hero4 cameras. Shooting great shots has never been easier. You’ll learn the tips and gear needed to get amazing photos.
Every model since the Hero5 and up to the Hero8 Black shoots at 12 megapixels and gives you control over features like white balance, shutter speed, and color capture.
The latest Hero11 Black shoots still photos at 27MP resolution.
I hope you’ll add to this list by sharing your GoPro photography tips at the end of this post.
16 GoPro Shooting Tips For Great Photos
While these tips are focused on capturing photos many will also apply to video.
Here’s a roundup of the tips in this post:
- Compose your photo
- Shoot on an extend pole
- Choose your lighting
- Think in angles
- Get some POV mounts
- Combat moisture
- Use a fast memory cards
- Carry extra batteries
- Play with shutter speed
- Adjust white balance for color temperature
- Use a tripod (with a level) for time-lapse and night photography
- Use burst mode: action and pets
- Get better selfies
- Use time-lapse photo mode for clear images
- Shoot in RAW and edit your photos
- Make a plan
And now let’s take a closer look at each of these tips.
1. Compose Your Photo
Great photos can happen by chance, but they are usually crafted. Here are a few composure rules that can help.
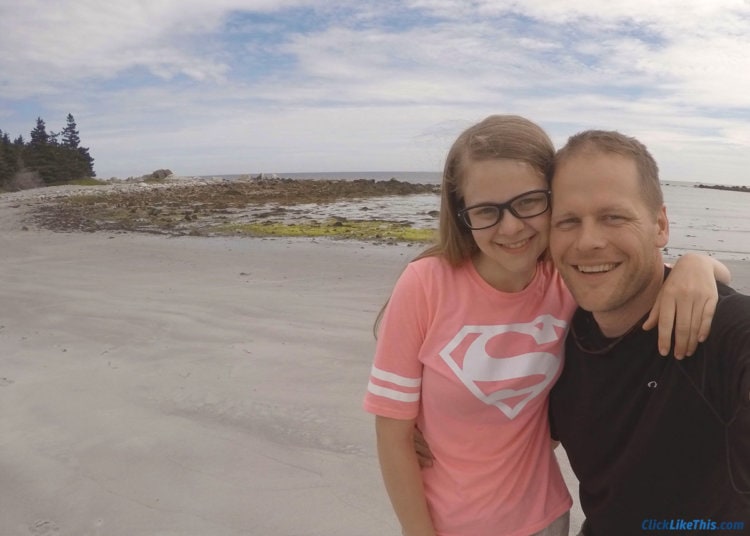
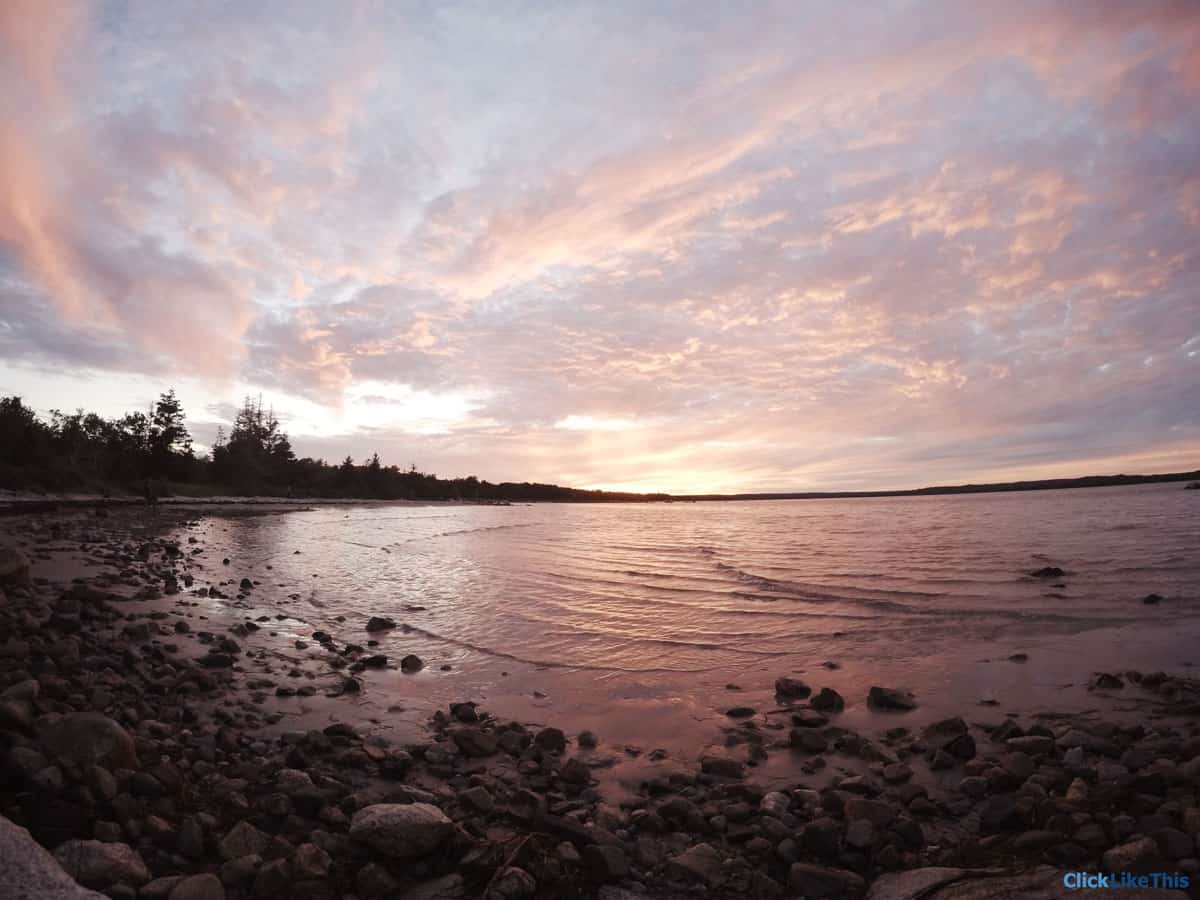
Keep the horizon straight. This will keep your photos looking right. A crooked horizon is distracting. When framing your shot hold the camera out in front of you and line up its top edge with the horizon line. You can use another straight point of reference as well, like the water’s edge or treeline.
![]() Use the rule of thirds. Break your scene into a mental grid of three equal parts horizontally and three equal parts vertically (like a tic-tac-toe board). Keep your foreground in the bottom third, your horizon in the middle third and your sky in the top third.
Use the rule of thirds. Break your scene into a mental grid of three equal parts horizontally and three equal parts vertically (like a tic-tac-toe board). Keep your foreground in the bottom third, your horizon in the middle third and your sky in the top third.
Place your subject in the right or left third of your grid. This will help you lead the eye. If your subject is in the right third, eyes will fall there first and then go to the left (and vice versa).
You can lead the eye up and to the left by placing your subject in the bottom right third. It’s fun to play around with this and make the eye bounce around your photos.
This can be tricky, so I always just give it my best shot and then fix things up while editing. The next photo was a selfie taken by my husband. The horizon was crooked, I straightened it and cropped it so that he and my daughter were in the right third of the frame.
Get close. The GoPro has a wide field of view which makes things look small. Getting close helps your subject stand out. Take several photos, each time getting closer to your subject. This will help you get a feel for how close you need to be.
Things remain in focus as close as 12 inches, that’s pretty close. So don’t be afraid to get close and fill the frame.
Don’t forget the foreground. Having objects in the foreground will make your photo more interesting. It helps you lead the eye through your photo.
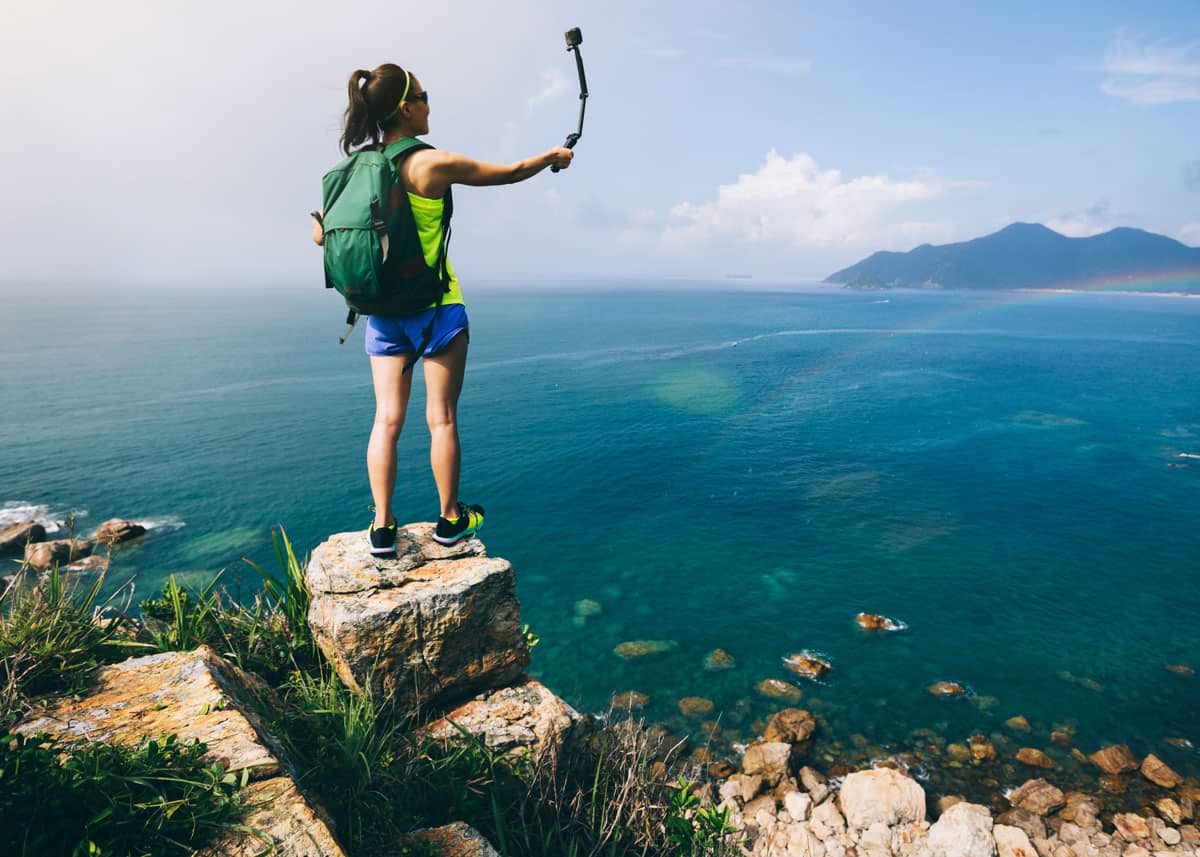
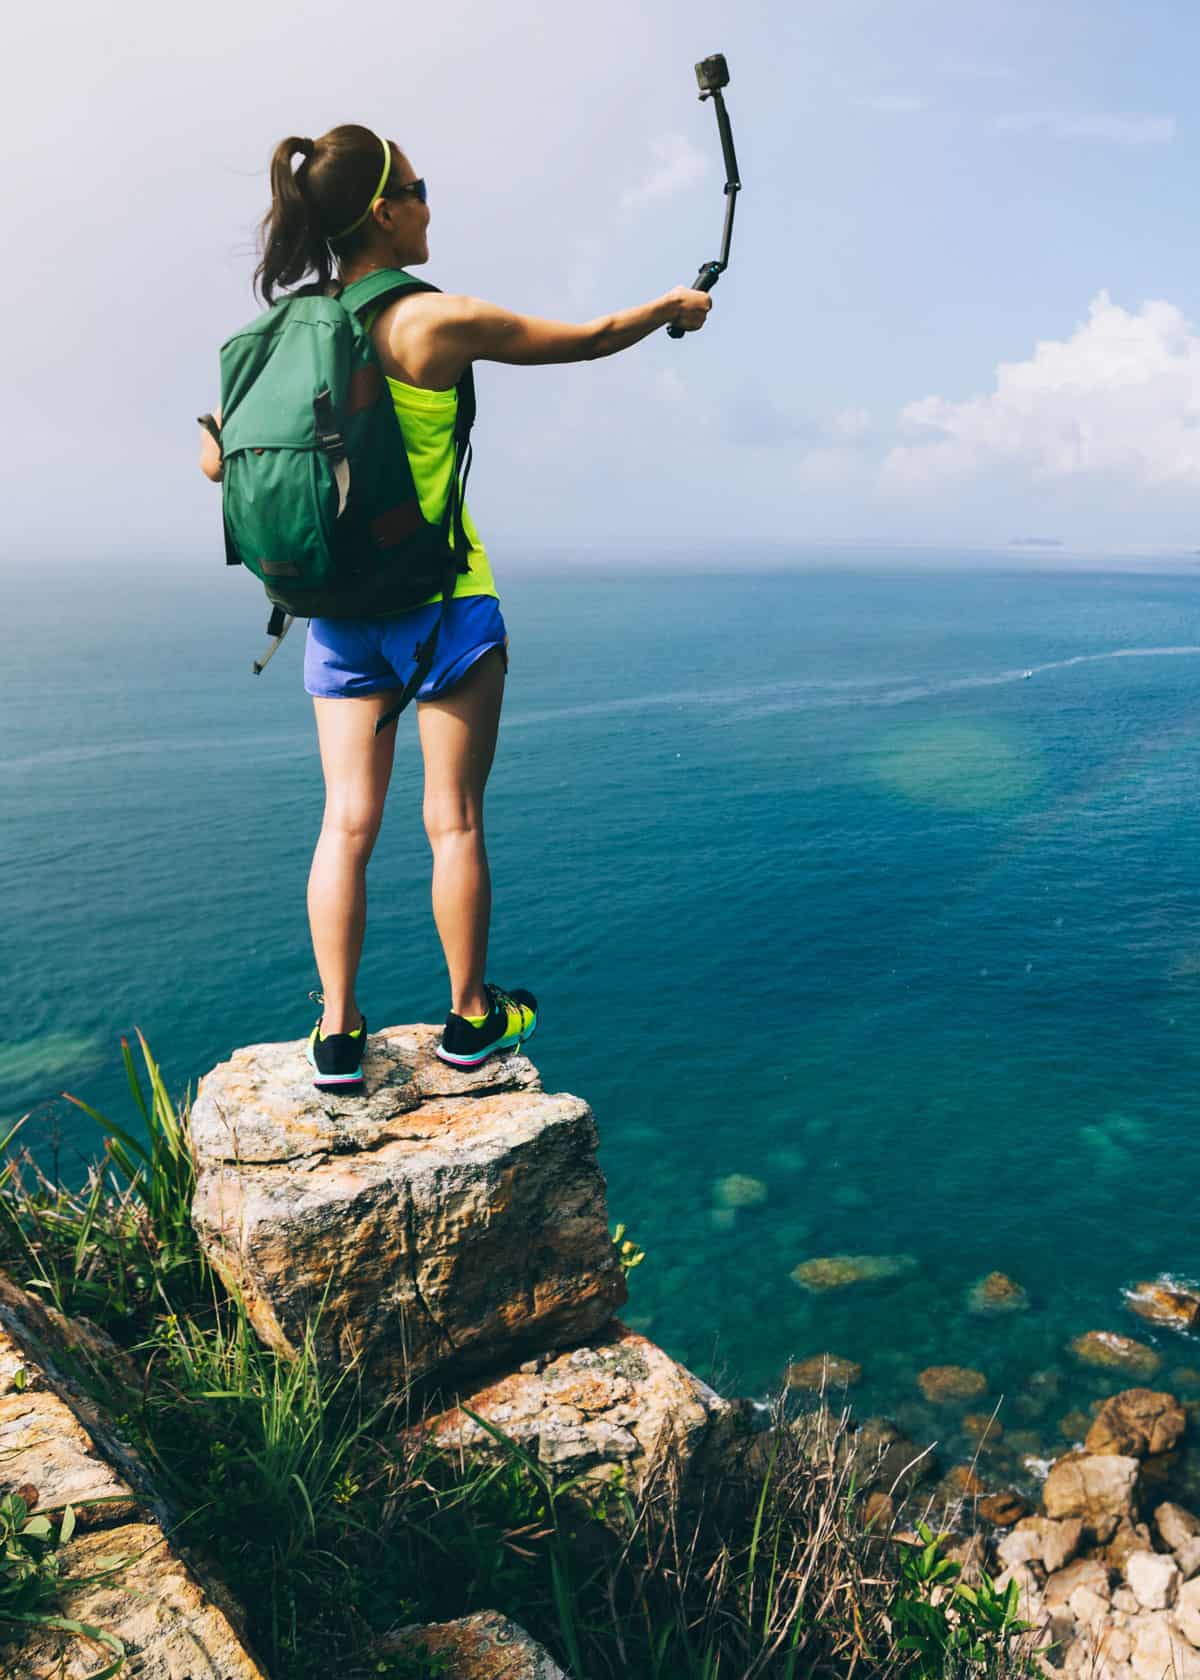
2. Shoot on an Extend Pole
The GoPro is tiny. It’s hard to hold and take clear photos so I use an extend pole.
![]() The extend pole helps keep the camera steady. It also means that my fingers don’t end up ruining my shot.
The extend pole helps keep the camera steady. It also means that my fingers don’t end up ruining my shot.
Travel with your camera on an extend pole and you’re always ready for a selfie. And you can extend your reach to get closer to plants, animals, and other hard to reach subjects.
Here are the best GoPro selfie sticks.
It can also be like a tripod/monopod. I do that by placing the end of the extend pole on the ground (helping with stability) while holding it with one or both hands. It can be tilted to capture interesting angles.
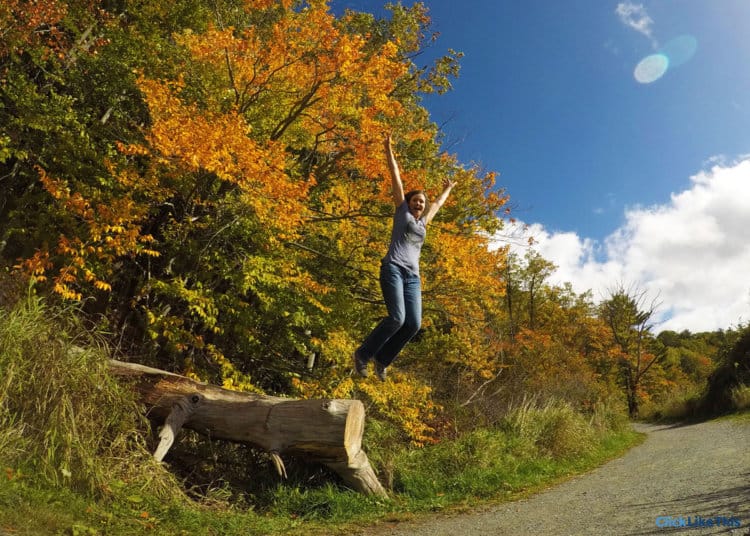
For the above photo (yes, I jump like a crazy person) the end of the extend pole was resting on the ground tilted back, so it was shooting at an up angle.
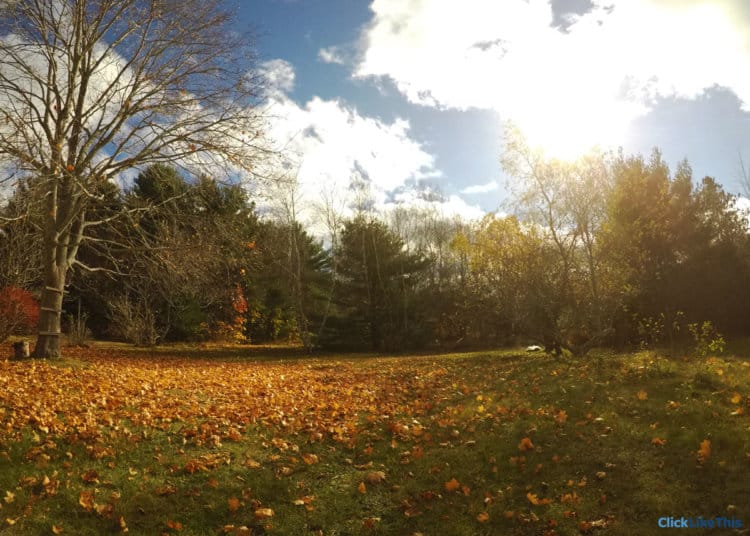
3. Choose Your Lighting
If you want your light to be cool and soft, head out early, just before sunrise. You’ll capture this cool light just after sunset as well.
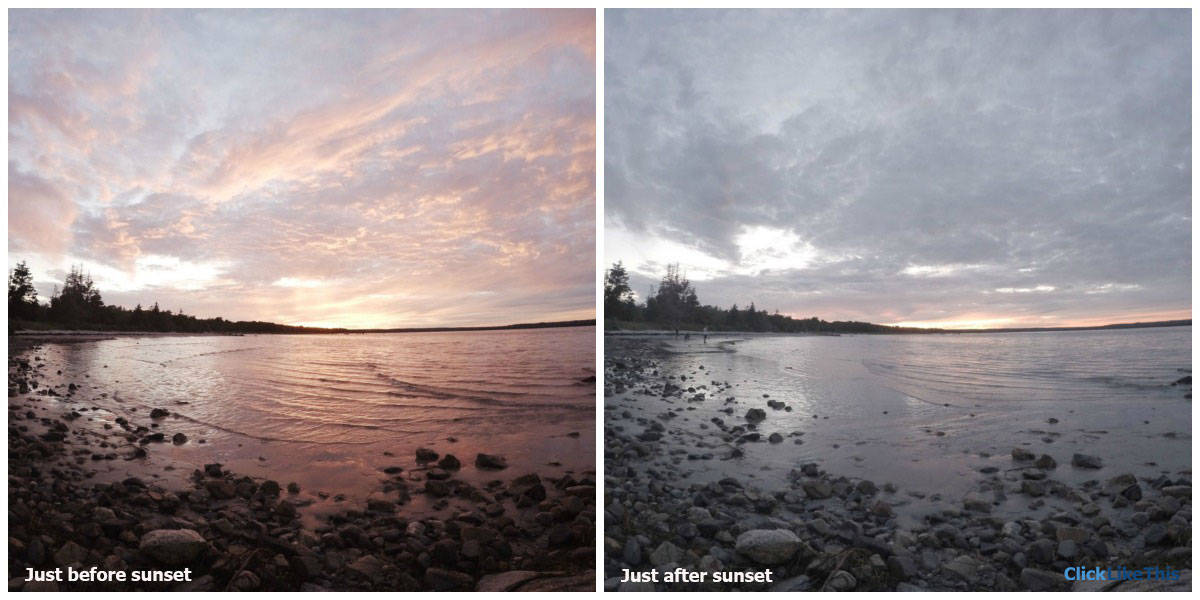
To get warm golden light, shoot during sunrise and sunset. An hour or so after sunrise and before sunset is great because the light is beautiful and glare is rarely a problem.
As the sun rises in the sky the light becomes more neutral and you lose that golden glow.
The GoPro handles harsh (really sunny) midday light pretty well. So don’t shy away from bright sunny days.
But try shooting in Protune Flat and Native (GoPro Hero4) or RAW (GoPro Hero5 Black) so you can lighten up the shadows and tame down the bright spots while editing. Hero5 Black also has a WDR setting to help balance things out.
Making use of shade on sunny days is a great idea too.

The white light on gray overcast days is great for photographing plants and flowers. Brightly painted buildings really pop in that light.
Moody photos with a brightly colored prop (umbrella, clothing…) also turn out well on dull days.
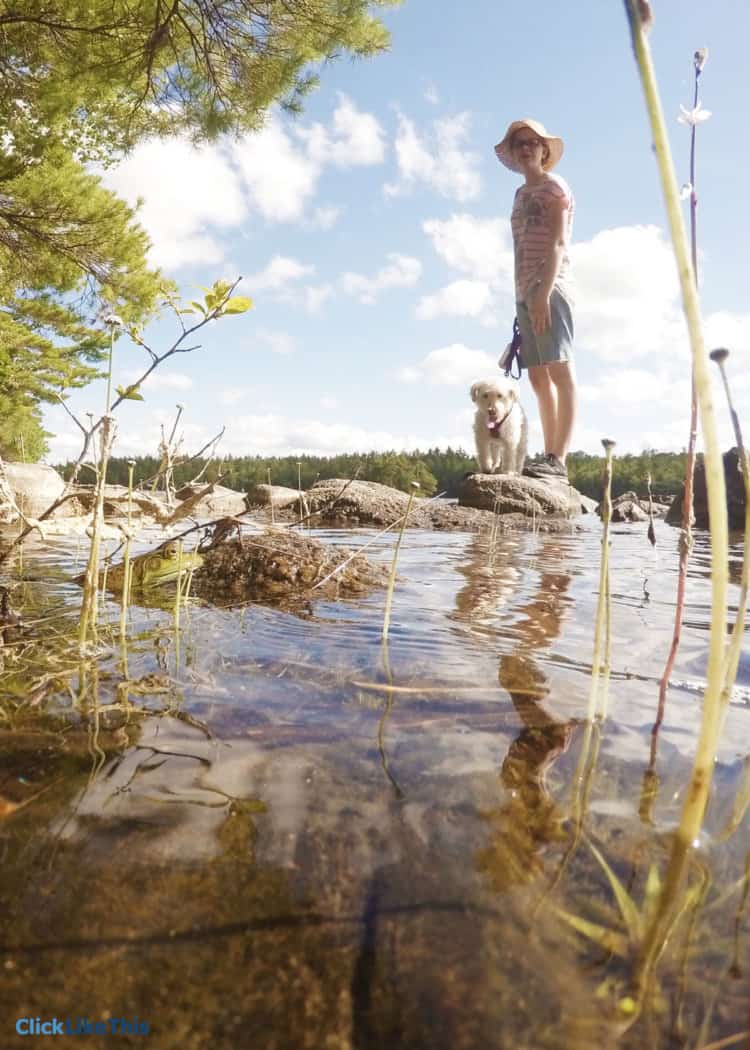
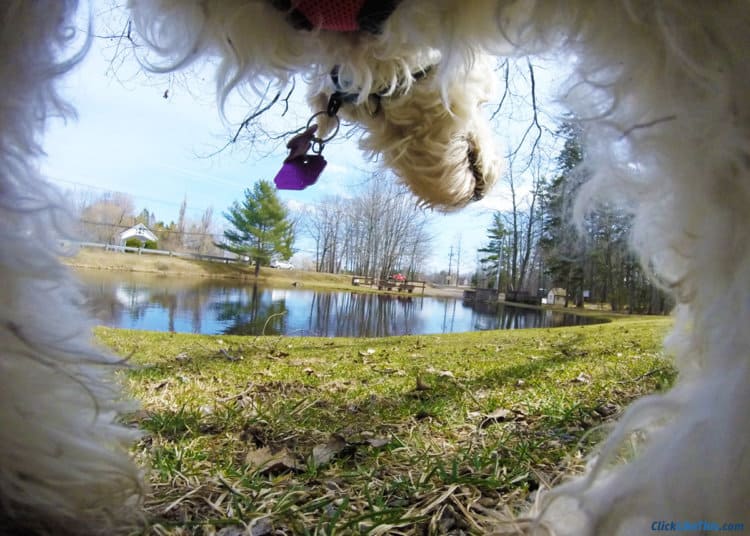
4. Think in Angles
Taking shots of your subject from different angles can be surprising. When I play around with angles I often end up with a more interesting shot than when I stick with a normal (eye level, straight-on) approach.
The following two photos show how shooting angles can turn a normal photo into a fun one.
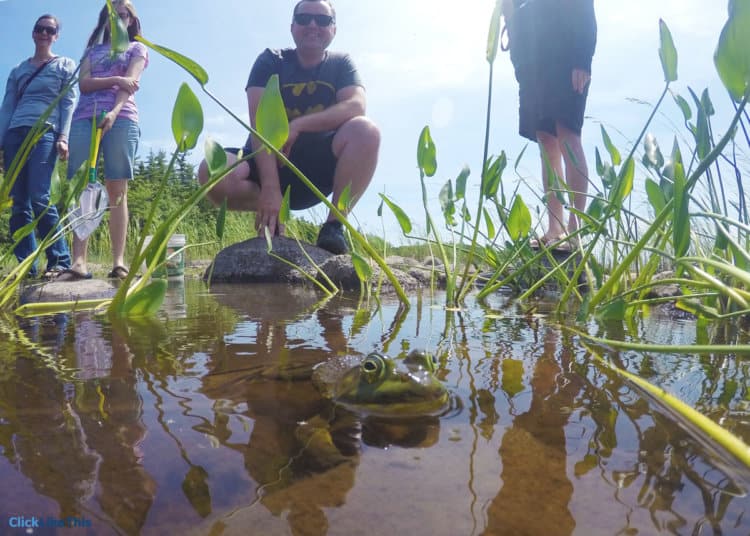
It’s easy to capture different angles with the GoPro. The camera is so small and light that you can snug it in and prop it up just about anywhere. And with your camera on an extend pole, capturing angles gets even easier.
Some fun angles to try are:
- Down low, looking up (makes your subject appear larger)
- High up, looking down (makes your subject look smaller)
- At ground level (shooting straight, feels like you are a little critter)
- Underwater looking up (dreamy look)

To add interest to your angles tilt the camera to the right or left. Combined with the above angles, this can make things look fun and distorted.
Try this as your subject reaches toward the camera, or pretends to kick or step on it.
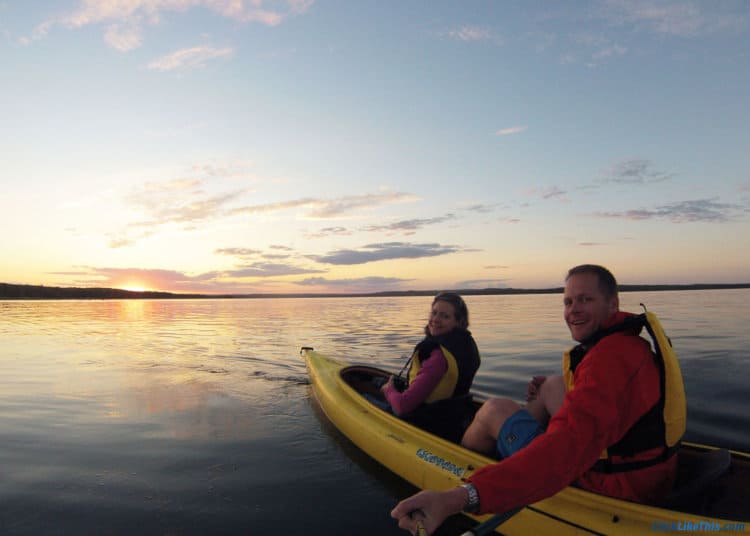
5. Get Some POV Mounts
Point of view (POV) mounts allow you to continue shooting hands-free (set to time-lapse mode). This is one of the great advantages of a GoPro over a DSLR. It’s so small you can wear or mount it pretty much anywhere you want.
There are a lot of unique mounts that allow you to capture your point of view, or that of your bike, canoe, snowboard, or even your puppy dog.
6. Combat Moisture
Once you place a GoPro in a waterproof housing or dome port you need to watch for water drops and fog.
Water drops can really distort your photos and fog will leave things looking blurry. There are a few ways to keep water drops off your lens. The easiest is to wipe it with your thumb whenever you bring it out of the water.
To combat fog use anti-fog inserts. Just drop a couple inside (at the back) of your waterproof housing.
7. Use a Fast Memory Card
![]() Fast memory cards are important for GoPro use because of the amount of data your camera is recording. And the speed at which you want it to do so.
Fast memory cards are important for GoPro use because of the amount of data your camera is recording. And the speed at which you want it to do so.
If you”re shooting a burst sequence or a time-lapse, you’re going to want your memory card to work fast so you don’t miss any of that footage. A slow memory card can cause your GoPro to choke.
I recommend that you use a 128GB card. (That’s what I use.)
Interested in more options? Here are the best memory cards for GoPro (all models).
8. Carry Extra Batteries
![]() GoPro cameras drain batteries really fast. To avoid running out carry extra.
GoPro cameras drain batteries really fast. To avoid running out carry extra.
Having an extra battery in your pocket on cold days can also help your battery maintain its charge. Cold batteries don’t work as well as warm ones. Keep the extra in an inside pocket, where it will be nice and warm.
If you do a lot of camping a solar panel charger could really come in handy.
Here are some tips to make your GoPro battery last longer.
9. Play With Shutter Speed
Use a slow shutter speed to capture light trails and illuminate your photos with starlight.
Here are some light trails from a driving shot. I was playing around, hand-holding the camera in this next shot. I set the shutter at 2 seconds in night-lapse photo mode.
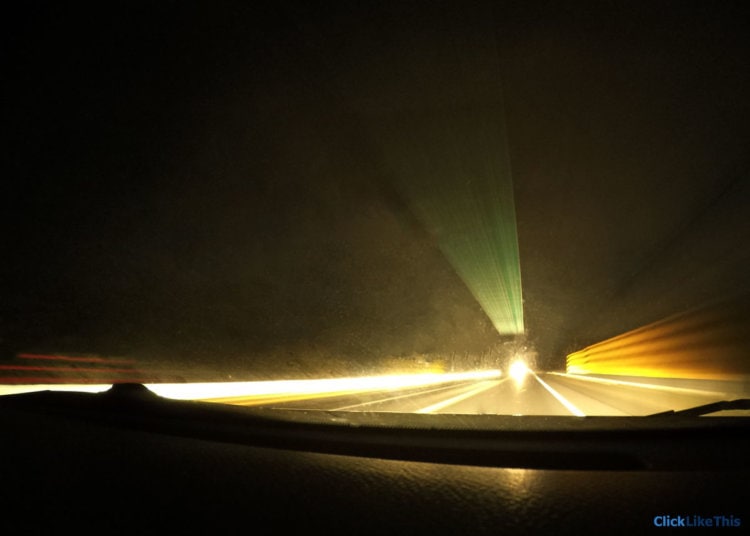
The best way to play with slow shutter speed is to put your GoPro in Photo Night-Lapse mode and choose a slow shutter speed.
![]() Here are a few suggestions:
Here are a few suggestions:
- 2, 5, or 10 seconds to capture light trails (for light painting and night traffic). These speeds also work for shooting at twilight, dawn, or dusk.
- 20 seconds to capture a moonlight sky. This will work best if there are other light sources in the scene as well.
- 30 seconds to capture starlight when you have no other source of light (complete darkness).
These next 2 shots of the moon were taken in our backyard – at around 10 PM. There were street lights nearby so I set the shutter for 2 seconds and then for 5 in night-lapse photo mode.
Shutter at 2 seconds:
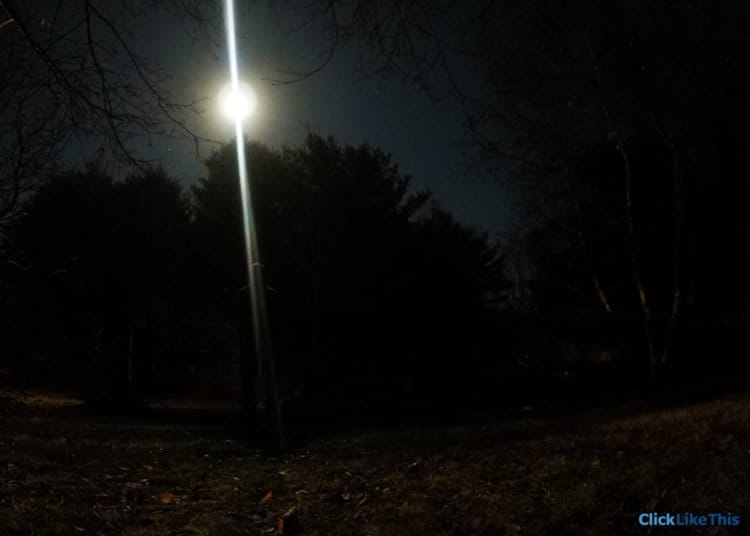
Shutter at 5 seconds:
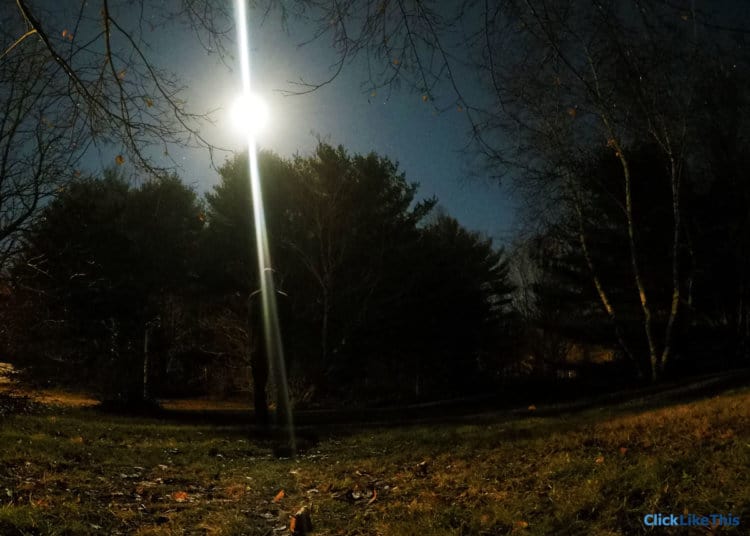
Set your GoPro on a tripod for stability. Without a tripod, everything will come out blurry.
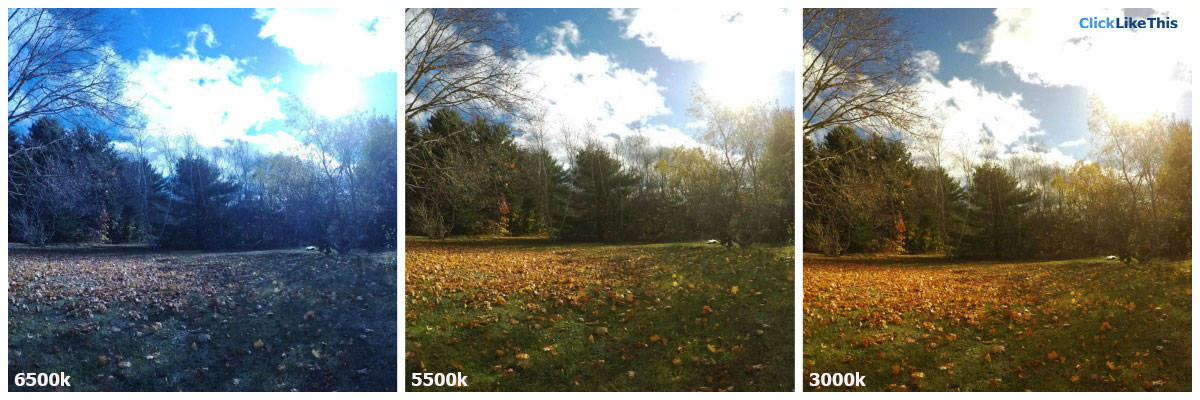
10. Adjust White Balance for Color Temperature
The auto white balance on GoPro does a great job, but you might want to change things up under certain circumstances. Like if you want to up the warm tones, try setting your white balance to 3000k.
When you are inside shooting under electric lights, you may need to adjust the white balance to make things look normal. Electric lights can throw things off and leave your skin tones and other colors looking weird. Try changing the white balance to 6500k and see if things look more normal.
Changing the white balance outside (day or night) can also help you change the mood of your photos.
When you take things from a warm glow to a cool cast, things can look quite different. For example, try 6500k rather than 3000k at sunset, and you’ll quickly see the difference white balance can make.
Try these settings to adjust for different light, or experiment for unique images.
- 6500k: (cool light) for shooting indoors with a lot of white (fluorescent) light, and outside with overcast conditions
- 5500k: (slightly cool light) daylight, for shooting outside with a clear sky
- 3000k: (warm light) sunrise, sunset, and incandescent light
- Native (Hero4) and RAW (Hero5) settings all capture a truer (less processed) image. They give you more to work with during editing
You can see the difference that color temperature makes in these next photos. They all received the same edits.
You’ll need to have Protune turned on to change your white balance. Don’t forget to set it back to auto when you’re finished experimenting.
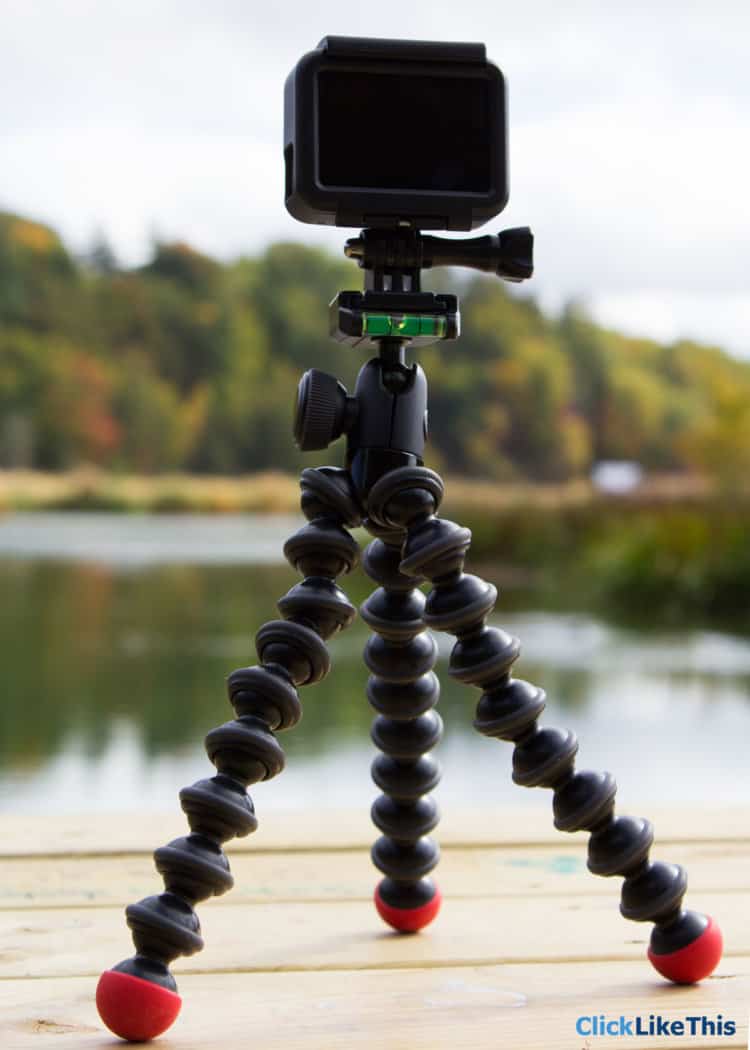
11. Use a Tripod With Level
![]() You’ll want to use a tripod with a level for time-lapse and night photography. The tripod is necessary to keep your camera steady. And the level makes setup easy.
You’ll want to use a tripod with a level for time-lapse and night photography. The tripod is necessary to keep your camera steady. And the level makes setup easy.
Timelapse: Without a level indicator on your tripod it’s hard to make sure your horizon is straight. A crooked horizon looks weird and can be a hassle to fix while editing.
Check out our GoPro Time Lapse Guide.
Night Photography: The same principle applies for night photography, except it can be even harder to make sure your horizon is straight. Having a flashlight handy to help as you get that little bubble centered is easy-peasy.
My favorite is the Joby Gorillapod mini. It’s lightweight, small, and really versatile.
12. Use Burst Mode for Action and Pets
You’ve probably tried to catch a friend (or your pet) in action and had to get them to do it over and over until you finally got the shot, right? That gets tiresome and kind of awkward.
Well, with Burst mode it’s way easier. You may need them to repeat the action a second time (until you get used to Burst Mode leg time, about 1 second) but that’s probably all it will take.
You can adjust the burst for how many photos you want to take per second. The faster the action the more photos per second you’ll need.
13. Get Better Selfies
![]() Get better selfies by using an extend pole (selfie stick).
Get better selfies by using an extend pole (selfie stick).
Try different arm positions so you can pick the best of the bunch. Your selfie will look more natural if you can get the shot with your arm in a natural position. Place your hand at waist level.
Tilt your GoPro at a 45-degree angle so you don’t get the pole in your shot.
Put your GoPro in time-lapse photo mode and set it to take a photo every 2-5 seconds. That will give you time to get ready and you won’t have to keep pressing the shutter button.
Another trick is to take your selfie from different angles.
Hold the camera high above you, out in front, down low, off to the right, off to the left… turn your head as you move the camera. This will allow you choose the best angle (both yours and the background) while editing.
14. Use Time-lapse Photo Mode For Clear Photos
If you’re hand-holding your GoPro put it in time-lapse photo mode and set it to take a photo every 2 to 5 seconds. Without having to continually press the shutter you’ll get clearer photos.
When you press the shutter button your camera moves which creates blurry photos.
With your camera in time-lapse mode, you won’t have to keep pressing the shutter, you’ll be able to concentrate on holding your camera steady. This will give you clearer photos. Take a few photos of the same scene to up your chances of getting a clear shot.
This will work well in bright light. But soon as the light starts getting dim you’ll need to use a tripod because your camera will choose a slower shutter speed. That will lead to blurry handheld photos.
15. Shoot in RAW
When you shoot in RAW (Hero5 Black) or Native (Hero4) you’ll capture more detail than with the default GoPro setting.
It’s kind of like shooting in RAW with a DSLR. You capture a larger file which means you have more to work with in editing.
I like shooting in RAW because my photos end up looking more natural. After my photos are edited, I often have to double-check in order to tell which ones I shot with the GoPro or the DSLR.
Editing your GoPro photos can really take them to the next level and allow you to use them for a more professional application. Like a travel blog or other marketing materials.
If you’re using a mix of stock photos and your own GoPro photos to promote your brand, the default GoPro color setting will throw things off.
But if you shoot in RAW (Hero5), Native or Protune Flat (Hero4) you can edit your photos to match the look of the stock photos you’ve purchased.
16. Make a Plan
They say “the last thing you hear is the first thing you remember“, so that’s why Make a Plan is the last in this list of GoPro shooting tips.
![]() It really helps to think ahead. Plan out what lighting will work best for your photo, what angle will make things look most interesting and what gear you’ll want on hand to get the look you’re after (and to avoid problems).
It really helps to think ahead. Plan out what lighting will work best for your photo, what angle will make things look most interesting and what gear you’ll want on hand to get the look you’re after (and to avoid problems).
If you have your camera all ready, you’ll be less distracted while the action is taking place. So plan your settings and have them set up before you start shooting.
I like to carry a little notebook (my favorite is by Moleskine). Before I head out (often the night before) I jot down setting and composure ideas, I also make note of what I want to capture so that I don’t get distracted by all the fun I’m having and miss my shot.
Want more GoPro tips? Check out these tips for GoPro underwater, for beginners, and 13 tips for the family.
What About You?
Do you have any GoPro shooting tips to add to this list? Please add yours by commenting on this post.
- About the Author
- Latest Posts
Hey, I’m Dena! I’m a content creator and co-founder of Storyteller Tech.
Experienced GoPro Videographer: I’ve been shooting with GoPro cameras since 2012. Our first GoPro was the Hero3 Silver, bought for a Galapagos press trip. And today, we own 20+ action cameras, including GoPro, DJI, and Insta360 cameras.
Professional Creator: Bryan and I have developed video and content marketing plans for numerous international travel brands. And we also run several content businesses.
Photography Writer: I’ve written photography tutorials for well-known sites, including Digital Photography School.
Dena also creates at Storyteller.Travel and is co-founder of Storyteller Media, a Canadian-based publishing company.
Naim
Saturday 9th of January 2021
Amazing information. For your information, I use the hero7 camera. I hope your tutorials will help me a lot to take professional pictures. Thank you so much Dena for sharing your valuable tips with us.
Hasibur Joy
Wednesday 22nd of July 2020
Although there isn’t anything wrong with a GoPro camera’s automatic settings — it’s actually incredibly useful for those new to shooting video — manually tinkering with your camera’s exposure can help produce a better shot, especially in tricky lighting conditions.
Andrea
Tuesday 25th of February 2020
Hi! Thank you for this information. I am just learning about these cameras and am looking for one to take pictures and videos at my bird feeders. Is there any particular model that is best for this purpose? What accessories would be most helpful? What are your thoughts on purchasing these cameras as refurbished? Thanks again!
Bryan Haines
Wednesday 26th of February 2020
Hey Andrea! I think any of the recent models will be fine - from the Hero5 to current will all be good.
Personally, I would be careful about refurbished units - if you do, just ensure that you have some type of warranty and that you know the vendor. Years ago, I bought a refurbished camera from big online vendors and it worked okay. But I wouldn't buy something like this through ebay or similar platform - there's just too many variables.
NickTick
Tuesday 3rd of December 2019
Great tips. I especially like the one about picking good angles.
Hans
Monday 13th of May 2019
What software do you use to edit your photo's or video's? Thanks
Bryan Haines
Tuesday 14th of May 2019
Here are some options for editing your GoPro footage. For photos, I prefer Photoshop. I'm working on a new piece about other, less expensive options for photo editing. Stay tuned.